
Fall DIY- Book Page Banner
October 16, 2017
Okay guys.
This is the first DIY I have ever attempted on this blog. The main reason is mostly because I am not an artistic person. If I were to show you my artwork, you would cringe. BUT, I've always liked looking at what other people make, and I LOVE the idea of cheap stuff, so I thought I would attempt one for you today. I'm actually quite proud of how it turned out, so if you want to learn how to make a Book Page Banner then keep reading.

Supplies:
- Book
- Cardstock paper
- Pennant Pattern
- Glue stick
- Twine
- Hole Puncher
- Pencil (not pictured)
- Clothes Pins (Not pictured. I used these to hang up the banner, but you can be creative and use another method!)
- Computer
Step #1:

On your computer, open a new Word document and type the word "FALL". You can make your letters as bug as you want but I put mine in 300 pt. font and used the "Bell Gothic Std Black" style. Print the letters on white card stock paper
Step #2:

Cut out the letters. Try to leave as little white space as possible.
Step #3:


Pick a page in the book and cut it out. Try to cut as close to the spine as possible. Tip: cutting pages at the beginning of the book is easier.
Step #4:


Lay the pennant outline over the back of the book page, then trace the outline of the pennant onto the page.
Step #5:

Cut on the line you traced to make the pennant shape. Your page should look something like this.
Step #6:


Glue the back of your letter onto the front of the book page. I centered mine the best I could but you can always use a ruler to make sure your letters are perfectly centered on the page.
Step #7:

Repeat steps 3-6 with the rest of the letters. Your pages should look like this now.
Step #8:


Punch a hole in the top corners of the paper. BE CAREFUL. BOOK PAGES ARE VERY THIN AND CAN TEAR EASILY. Make sure you don't punch your holes too close to the edge.
Step #9:
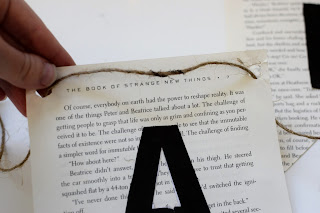
Step #9:


Take your twine and push it through the holes in your book pages. Make sure you cut the twine long enough for all for pages and a little extra for the ends.


Hang up your new decoration!


5 Comments